starcoder2-15b-instruct-v0.1-GGUF
- Original model: starcoder2-15b-instruct-v0.1
Description
This repo contains GGUF format model files for starcoder2-15b-instruct-v0.1.
About GGUF
GGUF is a new format introduced by the llama.cpp team on August 21st 2023. It is a replacement for GGML, which is no longer supported by llama.cpp. Here is an incomplete list of clients and libraries that are known to support GGUF:
- llama.cpp. This is the source project for GGUF, providing both a Command Line Interface (CLI) and a server option.
- text-generation-webui, Known as the most widely used web UI, this project boasts numerous features and powerful extensions, and supports GPU acceleration.
- Ollama Ollama is a lightweight and extensible framework designed for building and running language models locally. It features a simple API for creating, managing, and executing models, along with a library of pre-built models for use in various applications
- KoboldCpp, A comprehensive web UI offering GPU acceleration across all platforms and architectures, particularly renowned for storytelling.
- GPT4All, This is a free and open source GUI that runs locally, supporting Windows, Linux, and macOS with full GPU acceleration.
- LM Studio An intuitive and powerful local GUI for Windows and macOS (Silicon), featuring GPU acceleration.
- LoLLMS Web UI. A notable web UI with a variety of unique features, including a comprehensive model library for easy model selection.
- Faraday.dev, An attractive, user-friendly character-based chat GUI for Windows and macOS (both Silicon and Intel), also offering GPU acceleration.
- llama-cpp-python, A Python library equipped with GPU acceleration, LangChain support, and an OpenAI-compatible API server.
- candle, A Rust-based ML framework focusing on performance, including GPU support, and designed for ease of use.
- ctransformers, A Python library featuring GPU acceleration, LangChain support, and an OpenAI-compatible AI server.
- localGPT An open-source initiative enabling private conversations with documents.
Explanation of quantisation methods
Click to see details
The new methods available are:- GGML_TYPE_Q2_K - "type-1" 2-bit quantization in super-blocks containing 16 blocks, each block having 16 weight. Block scales and mins are quantized with 4 bits. This ends up effectively using 2.5625 bits per weight (bpw)
- GGML_TYPE_Q3_K - "type-0" 3-bit quantization in super-blocks containing 16 blocks, each block having 16 weights. Scales are quantized with 6 bits. This end up using 3.4375 bpw.
- GGML_TYPE_Q4_K - "type-1" 4-bit quantization in super-blocks containing 8 blocks, each block having 32 weights. Scales and mins are quantized with 6 bits. This ends up using 4.5 bpw.
- GGML_TYPE_Q5_K - "type-1" 5-bit quantization. Same super-block structure as GGML_TYPE_Q4_K resulting in 5.5 bpw
- GGML_TYPE_Q6_K - "type-0" 6-bit quantization. Super-blocks with 16 blocks, each block having 16 weights. Scales are quantized with 8 bits. This ends up using 6.5625 bpw.
How to download GGUF files
Note for manual downloaders: You almost never want to clone the entire repo! Multiple different quantisation formats are provided, and most users only want to pick and download a single folder.
The following clients/libraries will automatically download models for you, providing a list of available models to choose from:
- LM Studio
- LoLLMS Web UI
- Faraday.dev
In text-generation-webui
Under Download Model, you can enter the model repo: LiteLLMs/starcoder2-15b-instruct-v0.1-GGUF and below it, a specific filename to download, such as: Q4_0/Q4_0-00001-of-00009.gguf.
Then click Download.
On the command line, including multiple files at once
I recommend using the huggingface-hub Python library:
pip3 install huggingface-hub
Then you can download any individual model file to the current directory, at high speed, with a command like this:
huggingface-cli download LiteLLMs/starcoder2-15b-instruct-v0.1-GGUF Q4_0/Q4_0-00001-of-00009.gguf --local-dir . --local-dir-use-symlinks False
More advanced huggingface-cli download usage (click to read)
You can also download multiple files at once with a pattern:
huggingface-cli download LiteLLMs/starcoder2-15b-instruct-v0.1-GGUF --local-dir . --local-dir-use-symlinks False --include='*Q4_K*gguf'
For more documentation on downloading with huggingface-cli, please see: HF -> Hub Python Library -> Download files -> Download from the CLI.
To accelerate downloads on fast connections (1Gbit/s or higher), install hf_transfer:
pip3 install huggingface_hub[hf_transfer]
And set environment variable HF_HUB_ENABLE_HF_TRANSFER to 1:
HF_HUB_ENABLE_HF_TRANSFER=1 huggingface-cli download LiteLLMs/starcoder2-15b-instruct-v0.1-GGUF Q4_0/Q4_0-00001-of-00009.gguf --local-dir . --local-dir-use-symlinks False
Windows Command Line users: You can set the environment variable by running set HF_HUB_ENABLE_HF_TRANSFER=1 before the download command.
Make sure you are using llama.cpp from commit d0cee0d or later.
./main -ngl 35 -m Q4_0/Q4_0-00001-of-00009.gguf --color -c 8192 --temp 0.7 --repeat_penalty 1.1 -n -1 -p "<PROMPT>"
Change -ngl 32 to the number of layers to offload to GPU. Remove it if you don't have GPU acceleration.
Change -c 8192 to the desired sequence length. For extended sequence models - eg 8K, 16K, 32K - the necessary RoPE scaling parameters are read from the GGUF file and set by llama.cpp automatically. Note that longer sequence lengths require much more resources, so you may need to reduce this value.
If you want to have a chat-style conversation, replace the -p <PROMPT> argument with -i -ins
For other parameters and how to use them, please refer to the llama.cpp documentation
How to run in text-generation-webui
Further instructions can be found in the text-generation-webui documentation, here: text-generation-webui/docs/04 ‐ Model Tab.md.
How to run from Python code
You can use GGUF models from Python using the llama-cpp-python or ctransformers libraries. Note that at the time of writing (Nov 27th 2023), ctransformers has not been updated for some time and is not compatible with some recent models. Therefore I recommend you use llama-cpp-python.
How to load this model in Python code, using llama-cpp-python
For full documentation, please see: llama-cpp-python docs.
First install the package
Run one of the following commands, according to your system:
# Base ctransformers with no GPU acceleration
pip install llama-cpp-python
# With NVidia CUDA acceleration
CMAKE_ARGS="-DLLAMA_CUBLAS=on" pip install llama-cpp-python
# Or with OpenBLAS acceleration
CMAKE_ARGS="-DLLAMA_BLAS=ON -DLLAMA_BLAS_VENDOR=OpenBLAS" pip install llama-cpp-python
# Or with CLBLast acceleration
CMAKE_ARGS="-DLLAMA_CLBLAST=on" pip install llama-cpp-python
# Or with AMD ROCm GPU acceleration (Linux only)
CMAKE_ARGS="-DLLAMA_HIPBLAS=on" pip install llama-cpp-python
# Or with Metal GPU acceleration for macOS systems only
CMAKE_ARGS="-DLLAMA_METAL=on" pip install llama-cpp-python
# In windows, to set the variables CMAKE_ARGS in PowerShell, follow this format; eg for NVidia CUDA:
$env:CMAKE_ARGS = "-DLLAMA_OPENBLAS=on"
pip install llama-cpp-python
Simple llama-cpp-python example code
from llama_cpp import Llama
# Set gpu_layers to the number of layers to offload to GPU. Set to 0 if no GPU acceleration is available on your system.
llm = Llama(
  model_path="./Q4_0/Q4_0-00001-of-00009.gguf",  # Download the model file first
  n_ctx=32768,  # The max sequence length to use - note that longer sequence lengths require much more resources
  n_threads=8,            # The number of CPU threads to use, tailor to your system and the resulting performance
  n_gpu_layers=35         # The number of layers to offload to GPU, if you have GPU acceleration available
)
# Simple inference example
output = llm(
  "<PROMPT>", # Prompt
  max_tokens=512,  # Generate up to 512 tokens
  stop=["</s>"],   # Example stop token - not necessarily correct for this specific model! Please check before using.
  echo=True        # Whether to echo the prompt
)
# Chat Completion API
llm = Llama(model_path="./Q4_0/Q4_0-00001-of-00009.gguf", chat_format="llama-2")  # Set chat_format according to the model you are using
llm.create_chat_completion(
    messages = [
        {"role": "system", "content": "You are a story writing assistant."},
        {
            "role": "user",
            "content": "Write a story about llamas."
        }
    ]
)
How to use with LangChain
Here are guides on using llama-cpp-python and ctransformers with LangChain:
Original model card: starcoder2-15b-instruct-v0.1
StarCoder2-Instruct: Fully Transparent and Permissive Self-Alignment for Code Generation
Model Summary
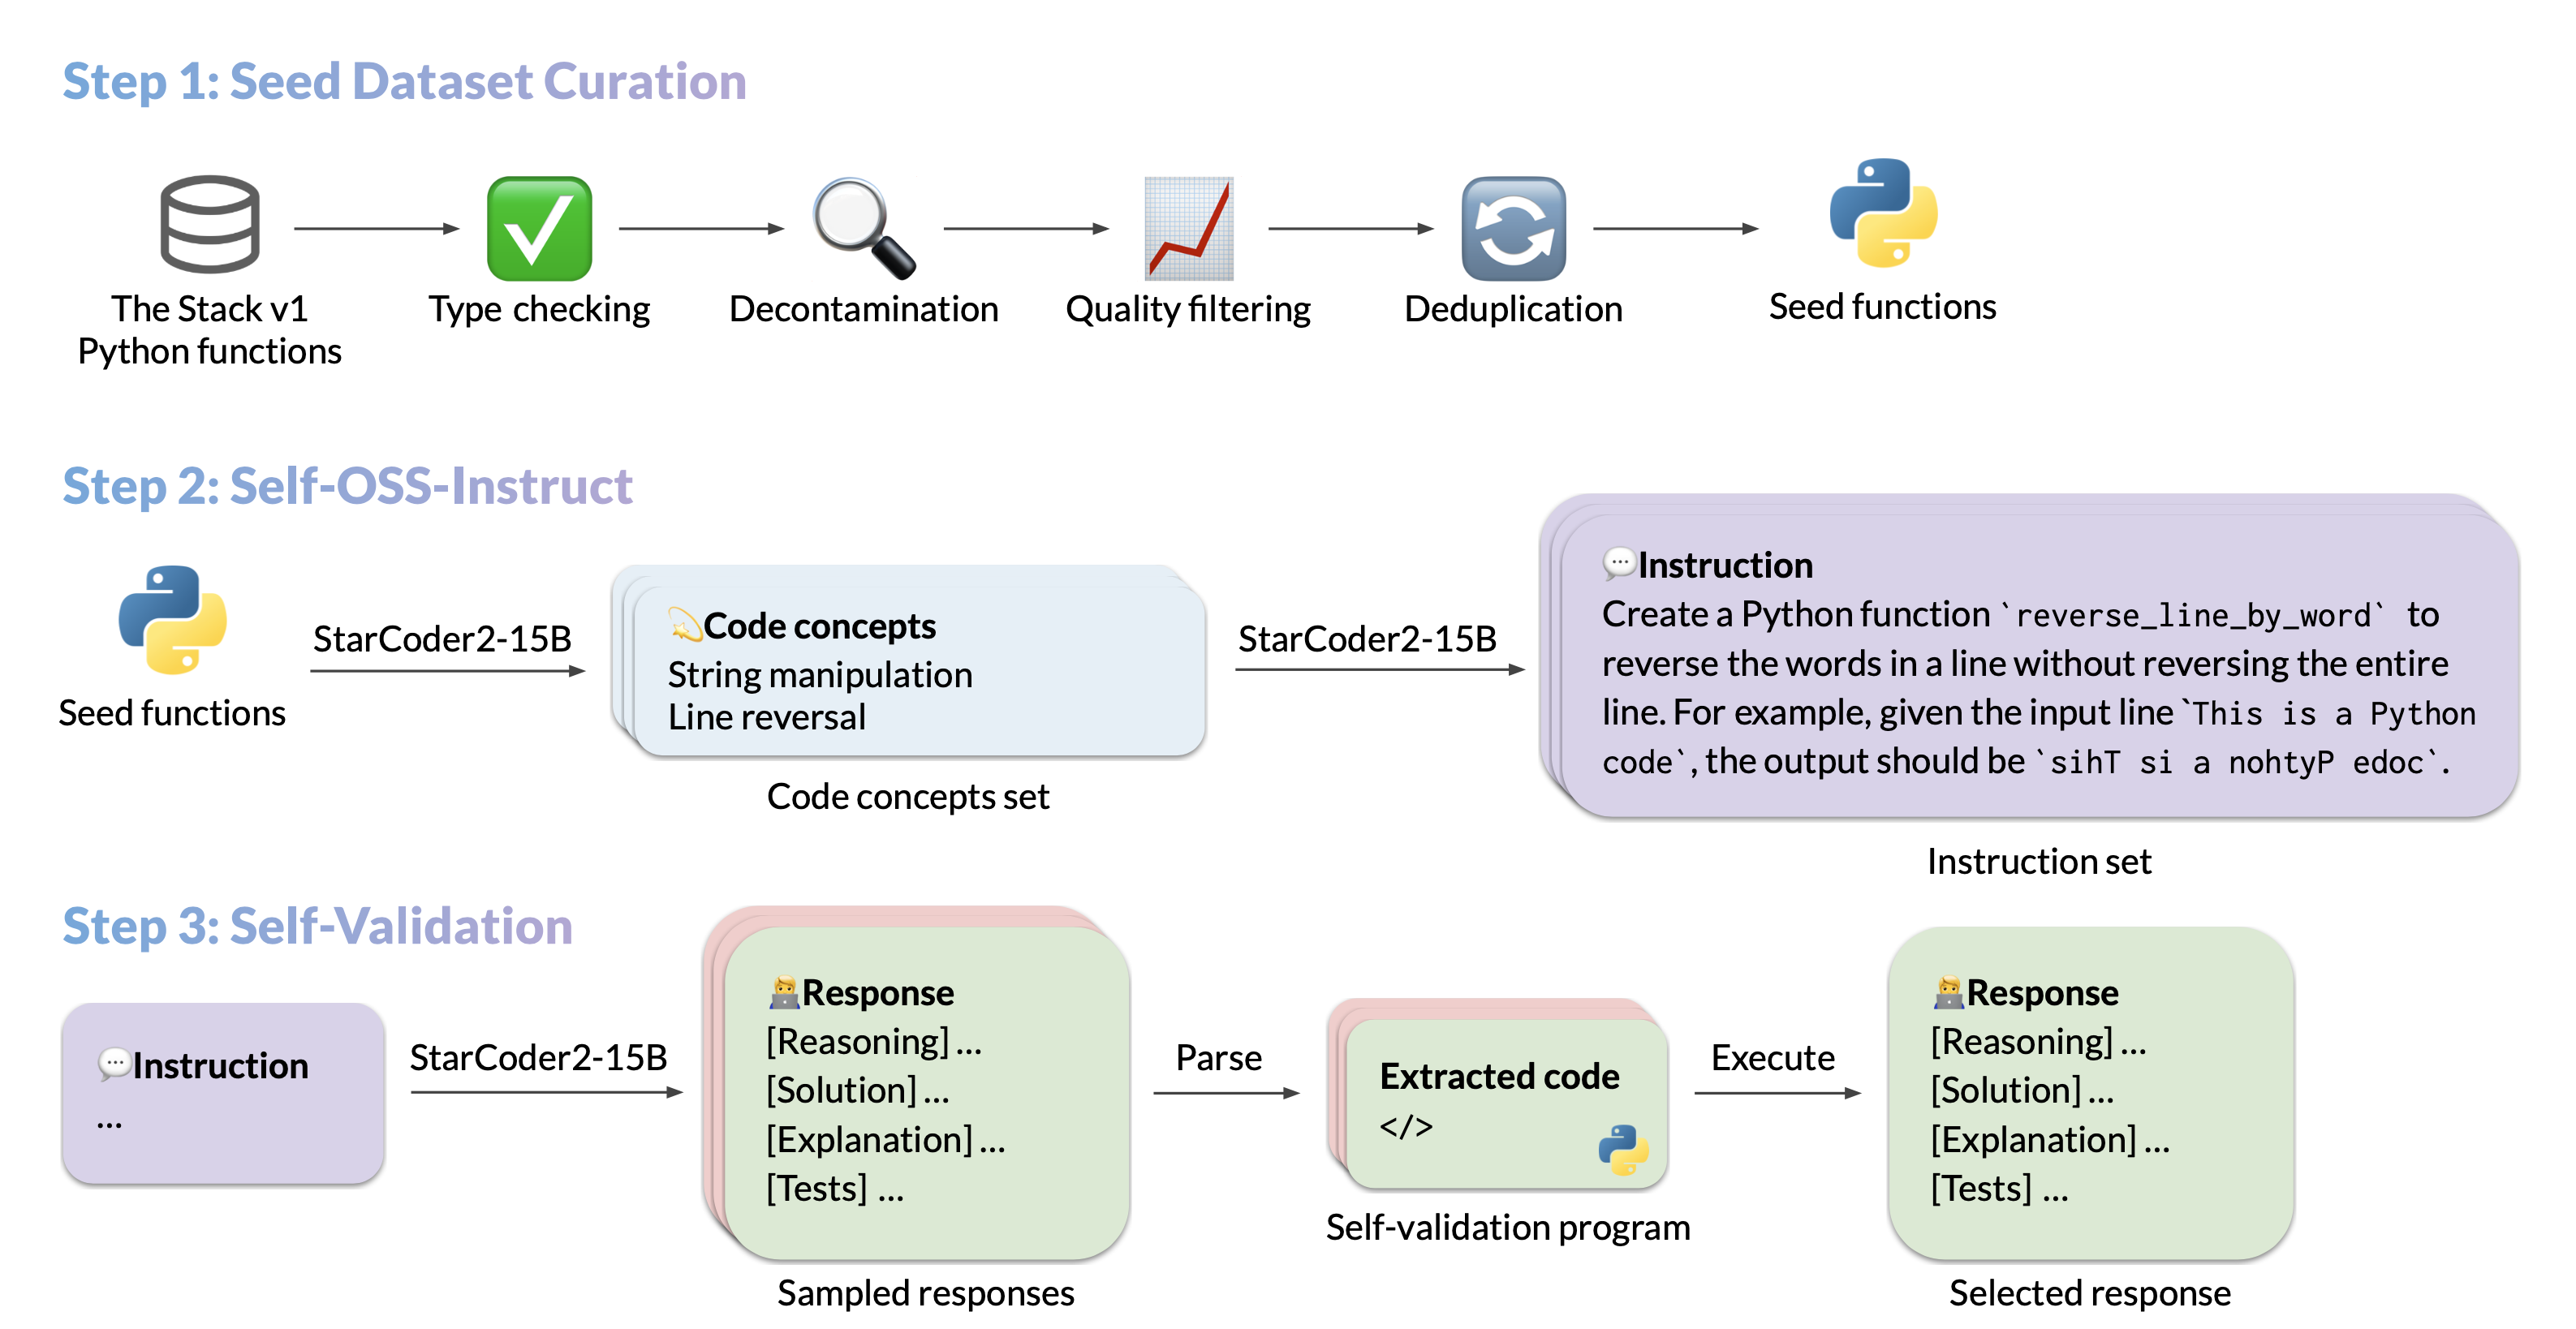
We introduce StarCoder2-15B-Instruct-v0.1, the very first entirely self-aligned code Large Language Model (LLM) trained with a fully permissive and transparent pipeline. Our open-source pipeline uses StarCoder2-15B to generate thousands of instruction-response pairs, which are then used to fine-tune StarCoder-15B itself without any human annotations or distilled data from huge and proprietary LLMs.
- Model: bigcode/starcoder2-15b-instruct-v0.1
- Code: bigcode-project/starcoder2-self-align
- Dataset: bigcode/self-oss-instruct-sc2-exec-filter-50k
- Authors: Yuxiang Wei, Federico Cassano, Jiawei Liu, Yifeng Ding, Naman Jain, Harm de Vries, Leandro von Werra, Arjun Guha, Lingming Zhang.
Use
Intended use
The model is designed to respond to coding-related instructions in a single turn. Instructions in other styles may result in less accurate responses.
Here is an example to get started with the model using the transformers library:
import transformers
import torch

pipeline = transformers.pipeline(
    model="bigcode/starcoder2-15b-instruct-v0.1",
    task="text-generation",
    torch_dtype=torch.bfloat16,
    device_map="auto",
)

def respond(instruction: str, response_prefix: str) -> str:
    messages = [{"role": "user", "content": instruction}]
    prompt = pipeline.tokenizer.apply_chat_template(messages, tokenize=False)
    prompt += response_prefix

    teminators = [
        pipeline.tokenizer.eos_token_id,
        pipeline.tokenizer.convert_tokens_to_ids("###"),
    ]

    result = pipeline(
        prompt,
        max_length=256,
        num_return_sequences=1,
        do_sample=False,
        eos_token_id=teminators,
        pad_token_id=pipeline.tokenizer.eos_token_id,
        truncation=True,
    )
    response = response_prefix + result[0]["generated_text"][len(prompt) :].split("###")[0].rstrip()
    return response


instruction = "Write a quicksort function in Python with type hints and a 'less_than' parameter for custom sorting criteria."
response_prefix = ""

print(respond(instruction, response_prefix))
Here is the expected output:
Here's how you can implement a quicksort function in Python with type hints and a 'less_than' parameter for custom sorting criteria:

```python
from typing import TypeVar, Callable

T = TypeVar('T')

def quicksort(items: list[T], less_than: Callable[[T, T], bool] = lambda x, y: x < y) -> list[T]:
    if len(items) <= 1:
        return items

    pivot = items[0]
    less = [x for x in items[1:] if less_than(x, pivot)]
    greater = [x for x in items[1:] if not less_than(x, pivot)]
    return quicksort(less, less_than) + [pivot] + quicksort(greater, less_than)
```
Bias, Risks, and Limitations
StarCoder2-15B-Instruct-v0.1 is primarily finetuned for Python code generation tasks that can be verified through execution, which may lead to certain biases and limitations. For example, the model might not adhere strictly to instructions that dictate the output format. In these situations, it's beneficial to provide a response prefix or a one-shot example to steer the model’s output. Additionally, the model may have limitations with other programming languages and out-of-domain coding tasks.
The model also inherits the bias, risks, and limitations from its base StarCoder2-15B model. For more information, please refer to the StarCoder2-15B model card.
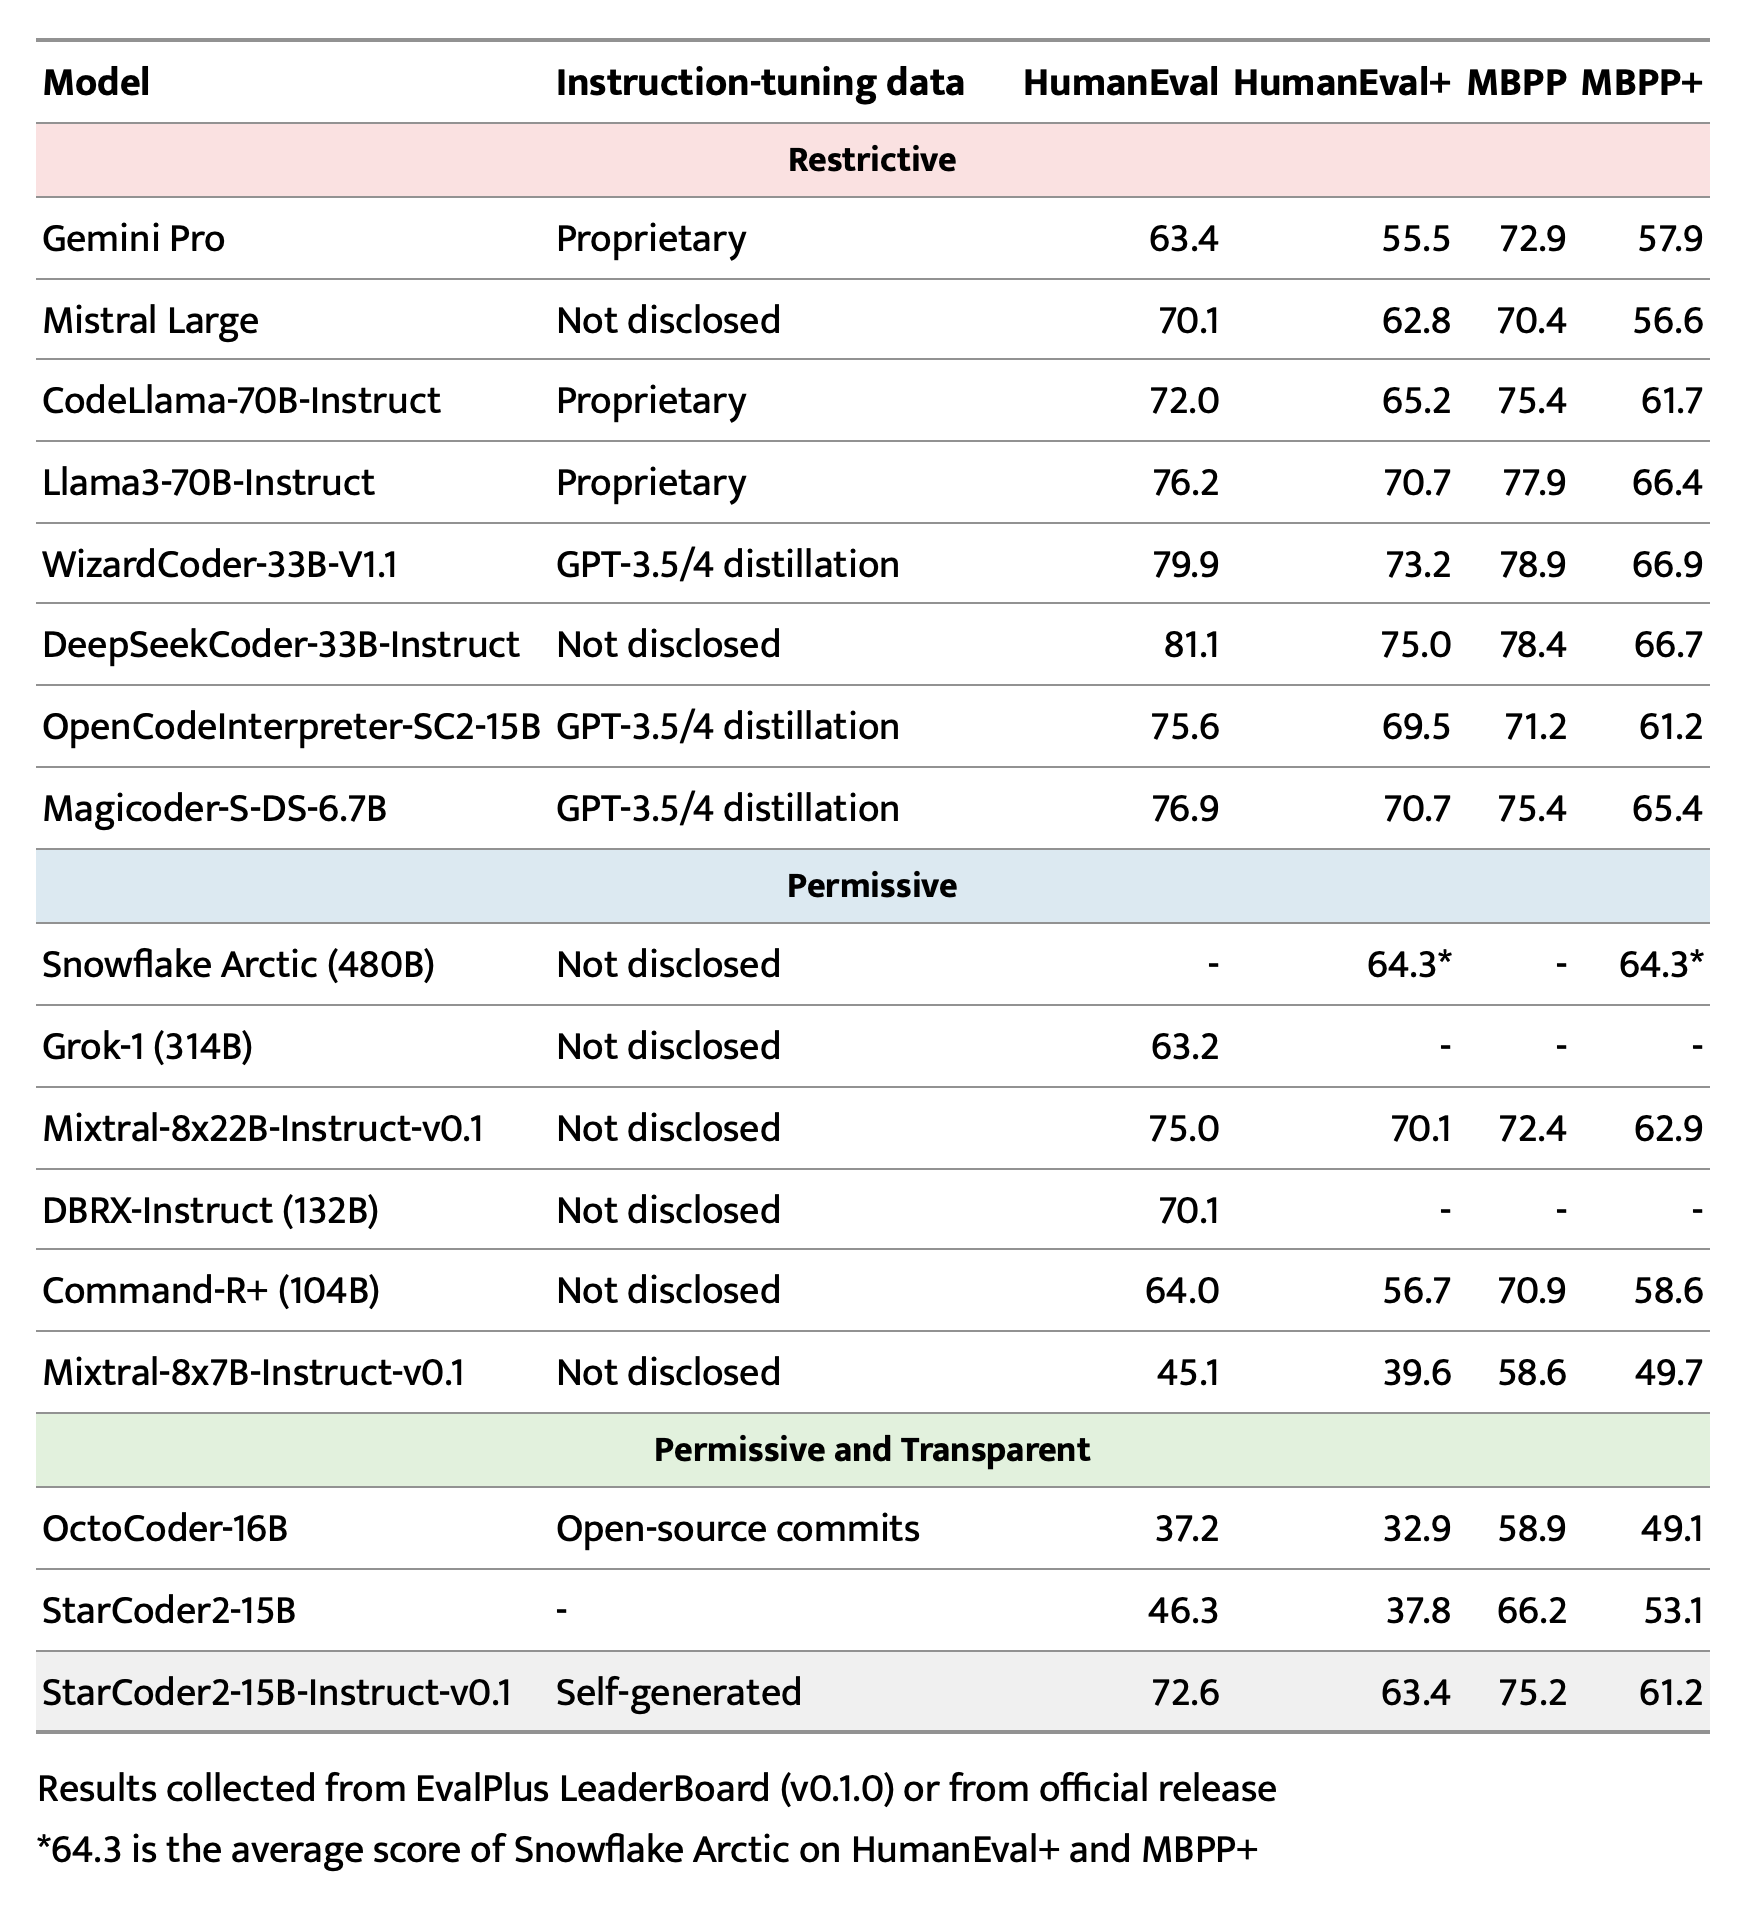
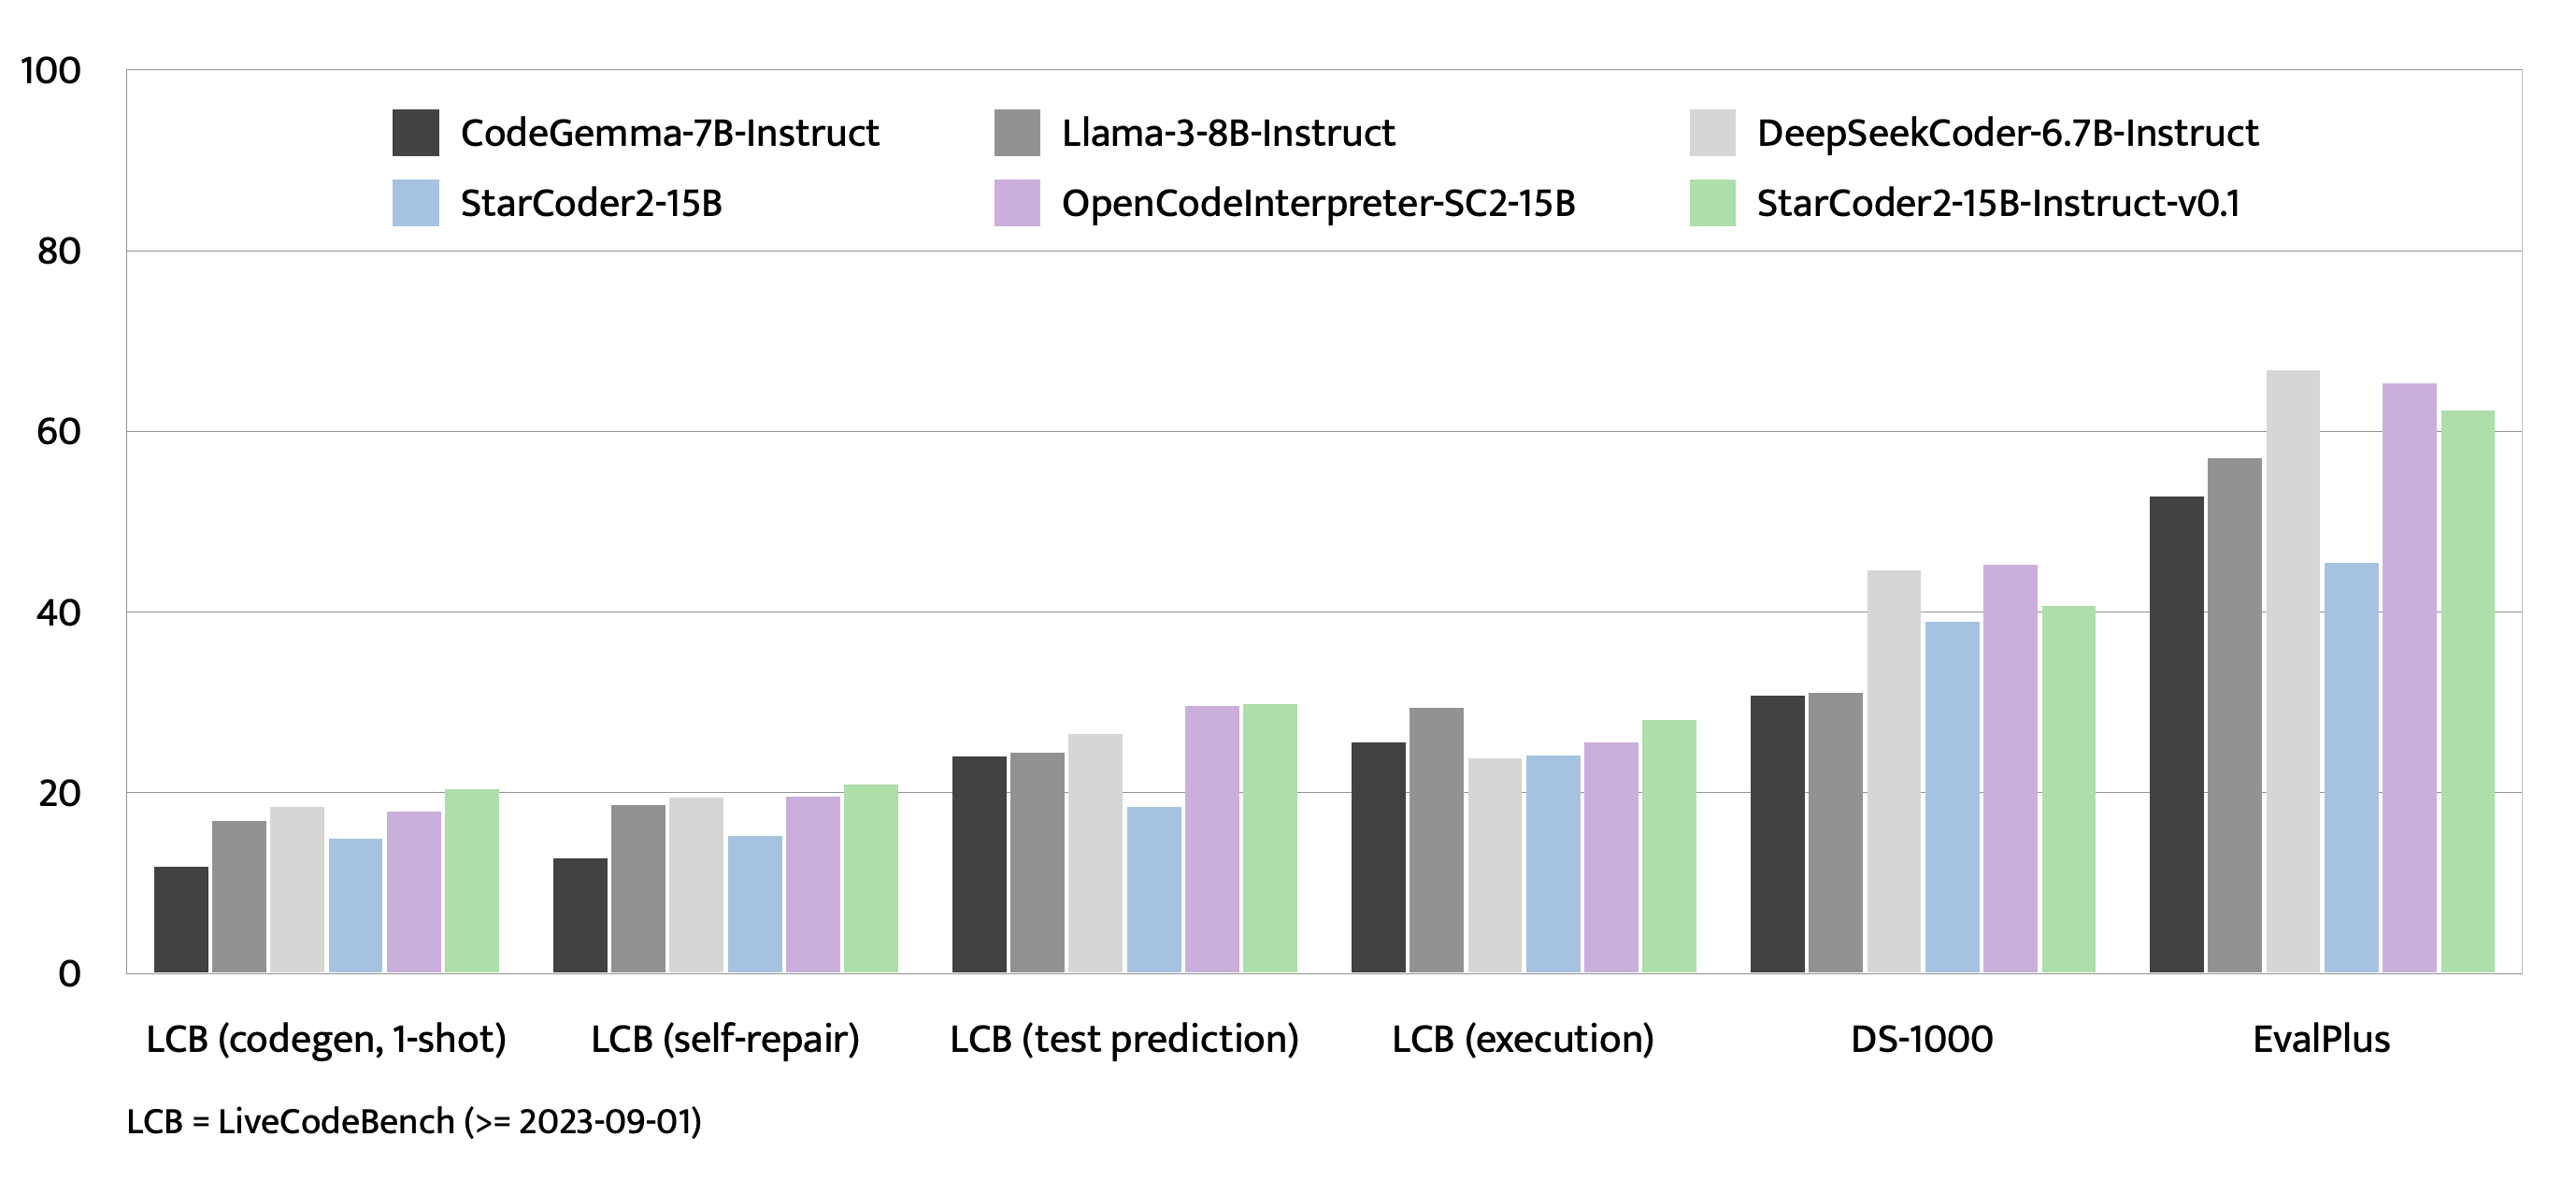
Evaluation on EvalPlus, LiveCodeBench, and DS-1000
Training Details
Hyperparameters
- Optimizer: Adafactor
- Learning rate: 1e-5
- Epoch: 4
- Batch size: 64
- Warmup ratio: 0.05
- Scheduler: Linear
- Sequence length: 1280
- Dropout: Not applied
Hardware
1 x NVIDIA A100 80GB
Resources
- Downloads last month
- 56
Model tree for LiteLLMs/starcoder2-15b-instruct-v0.1-GGUF
Base model
bigcode/starcoder2-15bDataset used to train LiteLLMs/starcoder2-15b-instruct-v0.1-GGUF
Evaluation results
- pass@1 on LiveCodeBench (code generation)self-reported20.400
- pass@1 on LiveCodeBench (self repair)self-reported20.900
- pass@1 on LiveCodeBench (test output prediction)self-reported29.800
- pass@1 on LiveCodeBench (code execution)self-reported28.100
- pass@1 on HumanEvalself-reported72.600
- pass@1 on HumanEval+self-reported63.400
- pass@1 on MBPPself-reported75.200
- pass@1 on MBPP+self-reported61.200
- pass@1 on DS-1000self-reported40.600


